Step-by-Step Guide: Hosting a Node.js App on AWS EC2 with Domain Name and SSL Certificate

This blog post is about hosting your nodejs application on AWS EC2 instance with domain name and secured it with free ssl certificate. Let's get started.
Create
Ec2instalce by choosing linux 2sLeave everything default and click launch instance
Go to instances and click your instace and click on connect. Then, you will see option to connect to instance. If you want to access instance terminal from web-browser you can click on
Connectbutton ofEC2 Instance Connect. Or, you can connect through SSH client. For that click onSSH clienttab to see what steps to take. As per instructions provided here, you need to openSSH clientsuch as linux terminal or git bash. Go to the folder where private key.pemfile is located and run following command which will give read only permision to the file
chmod 400 prevate-key-name.pem
Then, you are ready to connect instance using its public DNS or public ip address by following command
ssh -i "node-server-key.pem" ec2-user@13.54.206.174
Here, private key name is node-server-key, user is ec2-user and public id address is 13.54.206.174. You can use public DNS as well in place of public address
ssh -i "node-server-key.pem" ec2-user@ec2-13-54-206-174.ap-southeast-2.compute.amazonaws.com
After that you can have access to terminal through SSH client. Once you have access to the terminal,type following command
sudo yum install -y gcc-c++ make
then, it install nodejs by typing following command Type following command
sudo yum install -y nodejs
To check the version of nodejs run
node -v command
- Now you can clone node app from your github. Once the repo is downloaded go to that folder and run
npm instalwhich will install all the dependency. For environmental variables, you can create a new directory and create a.envfile there. You can put all environmental variables in that file:
touch /var/app/env/.env
Edit the file by running nano /var/app/env/.env
Save the .env file and we need dotenv package to load those environmental variables. For that run following command
npm install dotenv
Once it installed, in node.js application, we need config dotenv package on top of main application file.
require('dotenv').config({path: 'var/app/env/.env'})
For the access type your publicIP:portNum. In my case it is http://13.54.206.174:3000/
- If you want to run your sever in the background you can you
pm2which is a process manager for node.js application.pm2can handle to start, restart and stop the server and log managmement. To installpm2run following command
npm install pm2 -g
To start the server use command:
pm2 start app.js

To verify your server is running run following command
pm2 list
This will display a list of all processes managed by pm2
To stop the server
pm2 stop app.js
- If you have a domain name and you want to use it, you need to install
nginxwhich is a web server by following command
sudo yum install nginx
To run nginx run the command sudo systemctl start nginx and visit EC2 instance public IP address in the browser. You will see Nginx default welcome page.
Once it installed, you need to configure Nginx to act as a reverse proxy for the application. Open the configuration file by following command
sudo nano /etc/nginx/nginx.conf
Then, edit the nginx.conf file as following:
http {
    listen 80;
    server_name pblog.online www.pblog.online;

    location / {
      proxy_pass http://localhost:8000;
proxy_http_version 1.1;
proxy_set_header Upgrade $http_upgrade;
proxy_set_header Connection 'upgrade';
proxy_set_header Host $host;
proxy_cache_bypass $http_upgrade;
    }
}
Replace pblog.online with you domain name.
Once the file edited, we need to check if it is validate or not. For that run the following command:
sudo nginx -t

nginx: the configuration file /etc/nginx/nginx.conf syntax is ok
nginx: configuration file /etc/nginx/nginx.conf test is successful
If the test is successful, you can reload the nginx by the command sudo nginx -s reload.
You can check the nginx status by following command as well
sudo systemctl status nginx

● nginx.service - The nginx HTTP and reverse proxy server
     Loaded: loaded (/usr/lib/systemd/system/nginx.service; disabled; preset: disabled)
     Active: active (running) since Tue 2023-05-16 03:29:05 UTC; 43min ago
Add Domain Name
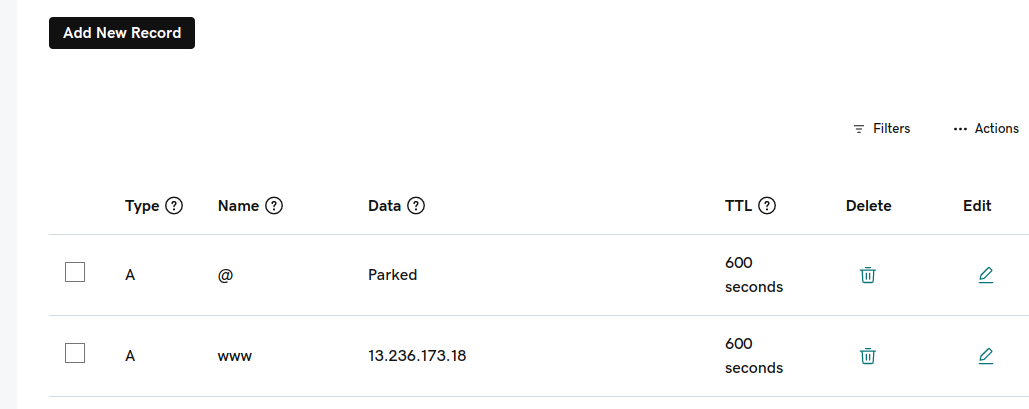
To add a custom domain name, first you need to assign Elastic IP address for you EC2 instance. You can do that from EC2 Dashbord, there you will elastic ip under Network & Security. Once you have assigned elastic ip address go to your domain name provider account and find DNS Records section. There we need to add new record. So, click on Add new record option. Select record type A, in Name section type www and value will be your elastic IP address and save it.
Now, hit your domain URL in the browser. It will take some time but you can visit your application running on EC2 instance by entering your domain name.

But the connection is not secured. To make it secured we need to add SSL certificate. We can do it for free with the help of Certbot. Run following commands to install certbot:
sudo yum install python3 python3-venv libaugeas0
sudo /opt/certbot/bin/pip install --upgrade pip
sudo /opt/certbot/bin/pip install certbot certbot-nginx
sudo ln -s /opt/certbot/bin/certbot /usr/bin/certbot
sudo python3 -m venv /opt/certbot/
Once it's done run the following command to get ssl certificate for you domain
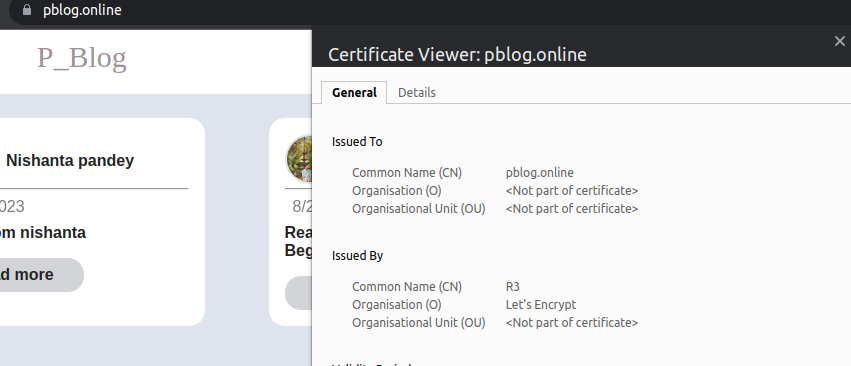
sudo certbot --nginx -d pblog.online -d www.pblog.online
Here, replace pblog.online with your own domain name.
certbot will ask you to confirm your domain name and add ssl certificate to your domain name. It will change configuration of nginx.conf file as well. Once the certificated is added nginx.conf file looks like this:
    server {
    server_name pblog.online www.pblog.online;

        root         /usr/share/nginx/html;

       # Load configuration files for the default server block.
        include /etc/nginx/default.d/*.conf;

        error_page 404 /404.html;
        location / {
 proxy_pass http://localhost:8000;
proxy_http_version 1.1;
proxy_set_header Upgrade $http_upgrade;
proxy_set_header Connection 'upgrade';
proxy_set_header Host $host;
proxy_cache_bypass $http_upgrade;
        }

        error_page 500 502 503 504 /50x.html;
        location = /50x.html {
        }

    listen [::]:443 ssl ipv6only=on; # managed by Certbot
    listen 443 ssl; # managed by Certbot
    ssl_certificate /etc/letsencrypt/live/pblog.online/fullchain.pem; # managed by Certbot
    ssl_certificate_key /etc/letsencrypt/live/pblog.online/privkey.pem; # managed by Certbot
    include /etc/letsencrypt/options-ssl-nginx.conf; # managed by Certbot
    ssl_dhparam /etc/letsencrypt/ssl-dhparams.pem; # managed by Certbot

}

    server {
    if ($host = www.pblog.online) {
        return 301 https://$host$request_uri;
    } # managed by Certbot


    if ($host = pblog.online) {
        return 301 https://$host$request_uri;
    } # managed by Certbot

        listen 80;
        listen [::]:80;

       server_name pblog.online www.pblog.online;
    return 404; # managed by Certbot

}
If you look at it closely, now our app is running on port 443 which is https connection. So, we have to make sure that port 443 is allowed in our ec2 instance security groups. If your ec2 instance security groups does not have https port enabled you can add new rule by clicking add rule button and select type HTTPS.

Now, visit your site by entering https://www.YOUR_DOMAIN_NAME.You will be able to see your site which is now secure with ssl certificate.
This way, you can run your nodejs app on ec2 instance with custom domain name.