Beginner's Guide to React-Redux: From Components to Connected Apps


Introduction
As per the official redux website, redux is a pattern and library for managing and updating application state, using events called actions. Redux serves as a centralized store for state that needs to be used across the entire application.
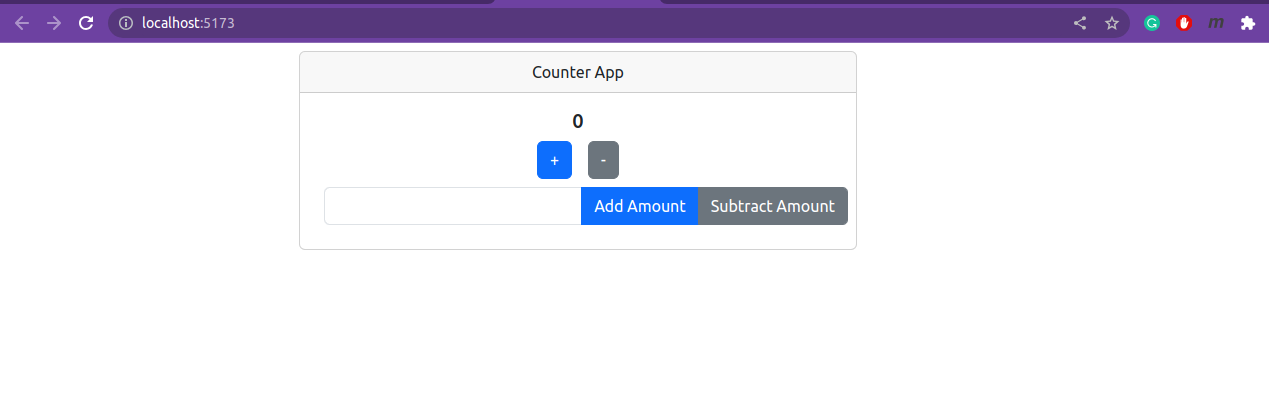
In this blog post, we will learn redux in react by building a Counter App.
Installation
To install redux in your react app run the following command.
npm install @reduxjs/toolkit react-redux
Create a redux store
Inside your src folder create a folder named app and inside this folder create a file named store.js. The redux store holds all states of the app in an immutable object tree. Now in store.js file write a following code
import {configureStore} from "@reduxjs/toolkit";

 const store = configureStore({
reducer:{

}

 })

export default store;
Here, we have created a store which is holding an empty reducer for now and exported it.
Go to our index.js file setup our redux store
import App from './App.jsx'
import store from './app/store.jsx';
import { Provider } from 'react-redux';
ReactDOM.createRoot(document.getElementById('root')).render(
  <React.StrictMode>

<Provider store={store}>

    <App />

</Provider>
  </React.StrictMode>,
)
We have imported store and Provider and we wrapped our <App/> component inside the provider which holds store. By doing this our store will become a global state.
Creating Slice Reducers and Actions
Let's create a folder features/counter inside app where we will have counter slice. A slice is a collection of Redux reducer login and actions for a single feature in your app.
Now, create a file counterSlice.js inside counter folder.
import { createSlice } from "@reduxjs/toolkit";


const initialState = {
    count :0
}


export const counterSlice = createSlice({
name:"counter",
initialState,
reducers:{
    increment :(state)=>{
        state.count += 1;
    },
    decrement :(state)=>{
        state.count -= 1;
    },
    incrementByAmount: (state, action)=>{
        state.count += action.payload;
    },
    decrementByAmount:(state, action)=>{
        state.count -=  action.payload
    }
}


})

export const {increment, decrement, incrementByAmount, decrementByAmount}= counterSlice.actions;
export default counterSlice.reducer;
createSlice is a function that accept slice name, an initial state, object of reducers function. We have created and exported counterSlice plus we have exported increment, decrement, incrementByAmount and decrementByAmount actions from counterSlice.actions and all reducer from counterSlice.reducer.
We have created a counter slice, it's time to import counterReducer inside our store.js file where we had an empty reducer.
import { configureStore } from "@reduxjs/toolkit";
import counterReducer from "./features/counter/counterSlice"
const store = configureStore({
reducer:{
counter:counterReducer
}


});
export default store;
The React Counter Component
Inside features/counter folder create a file name Counter.jsx. The Counter.jsx file will have following code.
import { Container, Button, Card, InputGroup, Form } from "react-bootstrap";
import { useState } from "react";
import {useSelector, useDispatch} from "react-redux";
import { increment, incrementByAmount, decrement, decrementByAmount } from "./counterSlice";

const Counter = ()=>{
const [addAmount, setAddAmount] = useState("");

const count = useSelector((state)=> state.counter.count);

const dispatch = useDispatch();


const amountHandeler = (e)=>{
    if(!Number(e.target.value)){
        return setAddAmount("");
    }
    setAddAmount(e.target.value);
}

    return<>
    <Container className="d-flex justify-content-center m-2 ">
    <Card className="text-center w-50">
      <Card.Header>Counter App</Card.Header>
      <Card.Body>
        <Card.Title>{count}</Card.Title>
       <div style={{display:"flex", gap:"1rem", justifyContent:"center", alignItems:"center"}}>
        <Button variant="primary" onClick={()=>dispatch(increment())}>+</Button>
        <Button variant="secondary" onClick={()=>dispatch(decrement())}>-</Button>
       </div>

       <InputGroup className="m-2">
        <Form.Control
        onChange={amountHandeler}
         value={addAmount}
        />
        <Button variant="primary" id="button-addon2" onClick={()=>dispatch(incrementByAmount(Number(addAmount)||0))}>
        Add Amount
        </Button>
        <Button variant="secondary" id="button-addon2" onClick={()=> dispatch(decrementByAmount(Number(addAmount)||0))}>
        Subtract Amount
        </Button>
      </InputGroup>


      </Card.Body>

    </Card>

    </Container>
    </>
}

export default Counter;
Here, we have imported useSelector and useDispatch from react-redux plus we have imported all actions from counterSlice.js file. We accessed the current count value with the help of useSelector. We have dispatched action with the help of useDispatch hook.
const count = useSelector((state)=> state.counter.count);
const dispatch = useDispatch();

<Button variant="primary" onClick={()=>dispatch(increment())}>+</Button>
        <Button variant="secondary" onClick={()=>dispatch(decrement())}>-</Button>
Do not forget to import <Counter/> component inside App.jsx file
createAsyncThunk
createAsyncThunk allows to write async logic that interacts with the store. Let's implement createAsyncThunk. For that create a folder fetchPost inside features folder and create a file name fetchPostSlice.js.
import { createSlice, createAsyncThunk } from "@reduxjs/toolkit";

const initialState = {
posts:null,
status:"idel",
error:null

}
const BASE_URL = "https://www.pblog.online/api/pmadhav279@gmail.com";

export const fetchPost = createAsyncThunk("fetch/post", async ()=>{
try{
const res = await fetch(BASE_URL);
if(!res.ok) throw Error("Failed to fetch post");
return res.json();
} catch(error){
    throw Error("Failed to fetch post")
}

})


const postsSlice = createSlice({
    name:"fetchPost",
    initialState,
    reducers:{},
   extraReducers:(builder)=>{
    builder
    .addCase(fetchPost.pending,(state,action)=>{
        state.status="loading"
    })
.addCase(fetchPost.fulfilled,(state,action)=>{
    state.status = "succeeded",
    state.posts = action.payload
})
.addCase(fetchPost.rejected, (state, action)=>{
    state.status = "failed",
     state.error = action.error
})
   }
})

export default postsSlice.reducer


export const getPosts = (state)=> state.fetchPost.posts;
export const getError = (state) => state.fetchPost.error;
export const getStatus = (state)=> state.fetchPost.status;
At first, we have defined the initial state.
const initialState = {
posts:null,
status:"idel",
error:null

}
Then, we used createAsyncThunk to handle async action where we have fetched data from URL
const BASE_URL = "https://www.pblog.online/api/pmadhav279@gmail.com";

export const fetchPost = createAsyncThunk("fetch/post", async ()=>{
try{
const res = await fetch(BASE_URL);
if(!res.ok) throw Error("Failed to fetch post");
return res.json();
} catch(error){
    throw Error("Failed to fetch post")
}

})
We created postsSlice by using createSlice where we handle pending, fulfilled and rejected action return from createAsyncThunk by using extraReducers
const postsSlice = createSlice({
    name:"fetchPost",
    initialState,
    reducers:{},
   extraReducers:(builder)=>{
    builder
    .addCase(fetchPost.pending,(state,action)=>{
        state.status="loading"
    })
.addCase(fetchPost.fulfilled,(state,action)=>{
    state.status = "succeeded",
    state.posts = action.payload
})
.addCase(fetchPost.rejected, (state, action)=>{
    state.status = "failed",
     state.error = action.error
})
   }
})
finally, we exported postsSlice.reducer and different state of our fetchPost that includes status, posts and error.
export default postsSlice.reducer
export const getPosts = (state)=> state.fetchPost.posts;
export const getError = (state) => state.fetchPost.error;
export const getStatus = (state)=> state.fetchPost.status;
Now, create a file FetchPost.jsx inside save folder. FetchPost.jsx will have following code:
import { useEffect } from "react";
import {useSelector, useDispatch} from "react-redux";
import { Button, Card } from "react-bootstrap";
import { getPosts, getError, getStatus, fetchPost } from "./fetchPostSlice";
const FetchPost = ()=>{
const dispatch = useDispatch();

const posts = useSelector(getPosts);
const status = useSelector(getStatus);
const error = useSelector(getError);

useEffect(()=>{
dispatch(fetchPost());

},[dispatch])

    return<>
    {status === "loading" && <p>Loading....</p>}
    {status === "failed" && error.message}


{status === "succeeded" && posts.map((post, index)=>{
    return <Card className=" p-1 m-2" >
        <Card.Title>
            {post.title}
        </Card.Title>
    </Card>
})}


    </>
}

export default FetchPost;
Here, we have extracted posts, status and error by using useSelector() hook and we have dispatch fetchPost() inside useEffect() hook
const FetchPost = ()=>{
const dispatch = useDispatch();

const posts = useSelector(getPosts);
const status = useSelector(getStatus);
const error = useSelector(getError);

useEffect(()=>{
dispatch(fetchPost());

},[dispatch])
And, based on status we have shown UI component.
Conclusion
We have learned a basic about react-redux and redux toolkit. I would like to mentioned some key notes from official redux website at the end.
configureStoreaccepts areducerfunction as a named argumentconfigureStoreautomatically sets up the store with good default settings- A "slice" contains the reducer logic and actions related to a specific feature / section of the Redux state
- Redux Toolkit's
createSliceAPI generates action creators and action types for each individual reducer function you provide - Call
dispatch(someActionCreator())in a component to dispatch an action - Wrapping the app with
<Provider store={store}>enables all components to use the store -Global state should go in the Redux store, local state should stay in React components